
Maths practical: the complete guide for students, teachers & parents 📐
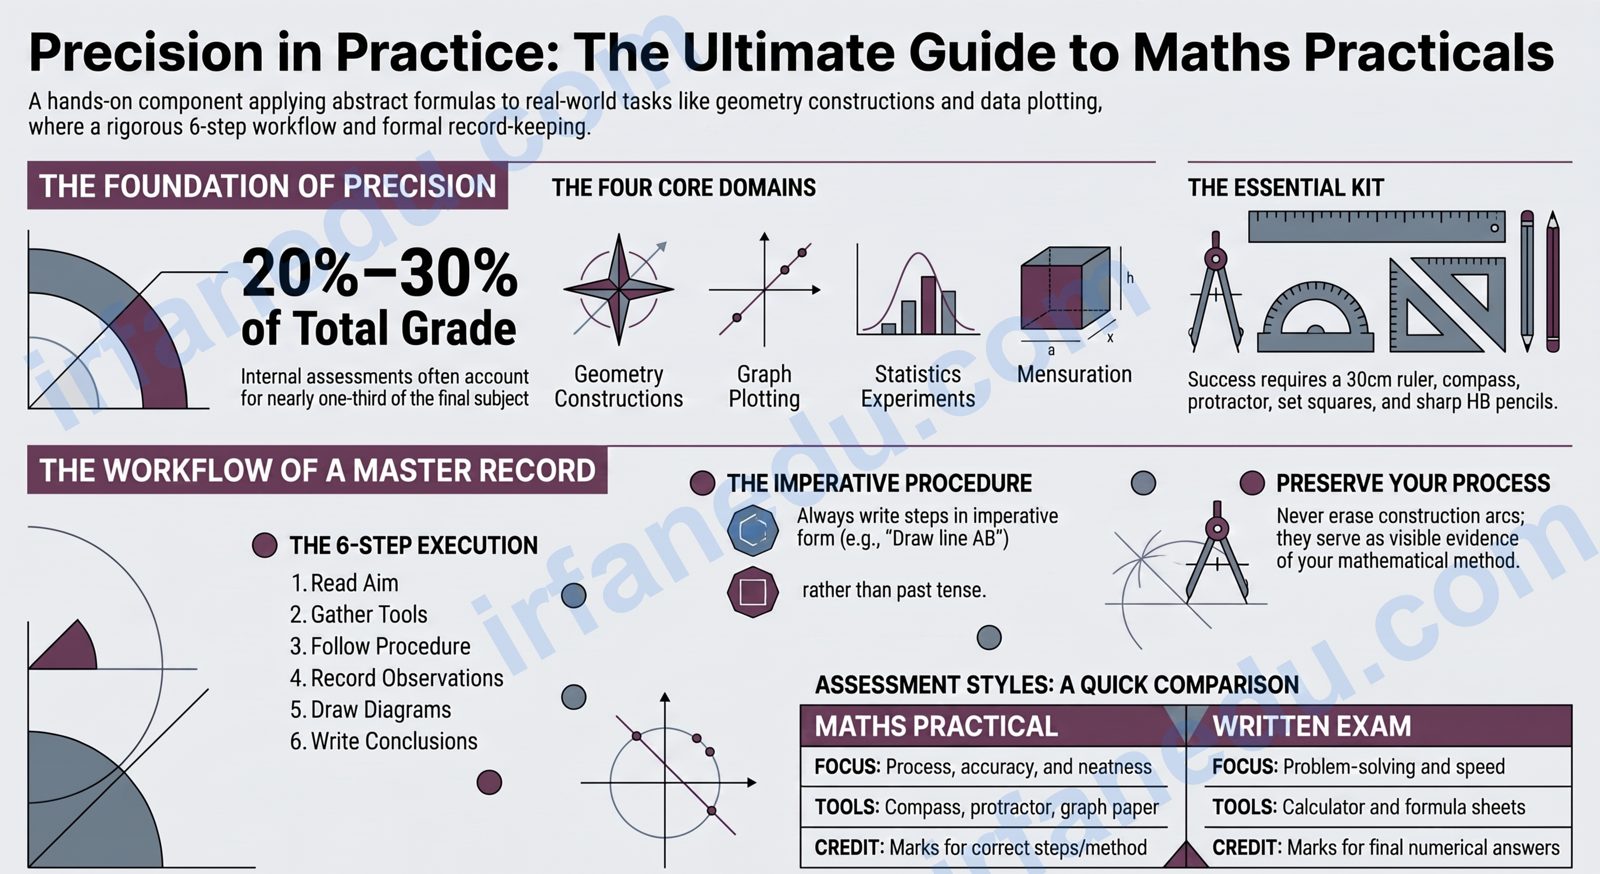
If maths practical has ever confused you, you’re not alone. Every year, thousands of students walk into their maths lab or sit down for their practical assessment feeling underprepared — not because the maths is too hard, but because nobody explained what a maths practical actually is or what to expect. This guide fixes that.
A maths practical is a hands-on, activity-based component of mathematics education where students apply concepts using physical tools, constructions, and data collection. It bridges the gap between abstract formulas and real-world understanding, covering geometry, statistics, graphs, and measurement.
By the end of this guide, you will know exactly what a maths practical involves, how to prepare for it, how to write a proper record, and how to score well. Let’s build your confidence, step by step. 💜
- Understand what a maths practical is and why it is assessed
- Know which topics appear most often in maths practicals
- Follow a clear step-by-step process for any practical activity
- Write a complete, well-structured maths practical record
- Use the preparation checklist before your assessment
A maths practical is a hands-on activity where students apply mathematical concepts using physical tools, constructions, or data collection instead of just solving written problems. It covers geometry constructions, graph plotting, statistics, and measurement tasks. Maths practicals build real understanding, improve exam scores, and show students that abstract formulas have concrete, real-world meaning.
- 📐 A maths practical uses tools like compass, ruler, and graph paper to apply maths hands-on.
- 📊 Core topics: geometry constructions, graph plotting, statistics, and measurement.
- 📝 Your record book must include aim, procedure, diagram, observations, and conclusion.
- ✅ Marks are awarded for accuracy, neatness, and correct process — not just the final answer.
- 🏠 You can and should practise maths practical activities at home before your assessment.
- 💡 The biggest mistake students make is rushing the diagram — slow, accurate work always scores higher.
- What is a maths practical?
- Why does maths practical matter for your grade?
- What topics appear in a maths practical?
- What tools do you need?
- How to complete a maths practical activity (step by step)
- How to write a maths practical record
- Worked example: bisecting a line segment
- Maths practical vs maths exam: key differences
- Common mistakes and how to avoid them
- Pre-assessment preparation checklist
- My key takeaway
- Quick knowledge check
- Frequently asked questions
- Key takeaways
- About the author
- Sources & references
What is a maths practical? 🔬
A maths practical is a structured, activity-based task where students use physical tools and methods to explore or demonstrate a mathematical concept. Unlike a written exam, the focus is on doing rather than just calculating.
Think of it like a science lab, but for mathematics. You might construct a geometric figure with a compass and ruler, plot a graph from a data set, measure angles in a triangle to verify a theorem, or run a probability experiment with a coin. The activity is recorded in a practical notebook, and marks are given for the process, accuracy, and presentation.
In my experience teaching maths at secondary level, students who take maths practicals seriously consistently score better in their written exams too. The hands-on work forces you to understand a concept rather than memorise it. When you physically bisect a line segment with a compass, the geometry stops being abstract — it clicks. That click is worth more than any formula sheet.
Maths practicals are assessed in most school curricula globally as part of the internal or continuous assessment component. The exact format varies, but the core idea is universal: apply maths, don’t just recite it.
Why does maths practical matter for your grade? 📈
Maths practical marks directly contribute to your final grade in most school assessment systems. Ignoring this component is one of the most common and costly mistakes students make.
In many curricula, internal assessment (which includes practicals) accounts for 20–30% of the total marks. A student who scores 90% in the written exam but neglects the practical can lose a full grade band. The practical is also one of the few places where you can earn marks for effort and process — even a partially correct construction earns credit if the steps are shown clearly.
| Feature | Detail |
|---|---|
| Assessment type | Internal / continuous assessment |
| Typical mark weightage | 20–30% of total subject marks |
| Core tool requirement | Compass, ruler, protractor, graph paper |
| Main topic areas | Geometry, graphs, statistics, mensuration |
| Record format | Aim, procedure, diagram, observations, conclusion |
| Marks awarded for | Accuracy, neatness, correct process, conclusion |
| Can practise at home? | Yes — plain paper and basic tools are sufficient |
What topics appear in a maths practical? 📐
Most maths practicals draw from four core areas: geometry, graphs, statistics, and measurement. Here is what each area typically involves.
Geometry constructions are the most common. You use a compass and ruler to construct triangles, bisect angles, draw perpendicular bisectors, inscribe circles, and verify geometric theorems. Accuracy is everything here — a 1 mm error in a construction can change the result.
Graph plotting involves drawing accurate graphs from equations or data sets. This includes linear graphs (y = mx + c), quadratic curves (y = ax² + bx + c), trigonometric graphs (sin x, cos x), and statistical graphs (bar charts, histograms, frequency polygons).
Statistics practicals require you to collect or use a given data set, calculate measures of central tendency (mean, median, mode), draw frequency tables, and plot cumulative frequency curves (ogives) to estimate the median and quartiles.
Mensuration and measurement tasks ask you to measure real objects or drawn figures to verify formulas for area, perimeter, surface area, and volume.
In my experience, the statistics practical — specifically the cumulative frequency curve — trips up more students than any geometry construction. The reason is almost always the same: students plot the cumulative frequency against the upper class boundary, not the midpoint. If your teacher hasn’t made this explicit, write it on a sticky note and put it in your record book right now.
What tools do you need for a maths practical? 🧰
Having the right tools — and knowing how to use them — is half the battle. Here is the complete kit you need.
- 📏 Ruler (30 cm): for straight lines and measurements
- 🔵 Compass: for arcs, circles, and geometric constructions
- 📐 Protractor: for measuring and drawing angles accurately
- 📐 Set squares (45° and 60°): for perpendicular and parallel lines
- ✏️ Sharp HB pencil: thin lines are more accurate than thick ones
- 🧹 Eraser: clean corrections only — no scribbling over errors
- 📄 Graph paper: 1 mm or 2 mm grid for graph plotting activities
- 📄 Plain A4 paper: for geometry constructions
- 🔢 Scientific calculator: for statistical calculations
- 📓 Maths practical record book: your official submission document
Always bring a spare compass needle and a spare pencil to your practical assessment. A slipping compass point is the single most common cause of inaccurate constructions — and you won’t have time to borrow one mid-exam.
How to complete a maths practical activity (step by step) 🪜
Follow these six steps for any maths practical activity and you will produce a complete, mark-worthy submission every time.
- Read the aim carefully. Before picking up any tool, read the activity title and aim twice. Identify exactly what you are being asked to construct, measure, or calculate.
- Gather your tools. Lay out everything you need before you start. Interrupting a construction to search for a protractor breaks your focus and wastes time.
- Work through the procedure step by step. Do not skip steps. Each step in a geometry construction builds on the previous one. Rushing causes compounding errors.
- Record observations as you go. Write down every measurement, angle, or data point the moment you find it. Do not reconstruct from memory at the end.
- Draw a neat, labelled diagram or graph. Use a sharp pencil. Label every point, line, angle, or axis. A diagram without labels earns fewer marks even if the construction is correct.
- Write a clear conclusion. In 2–3 sentences, state what the activity demonstrated and link it back to the mathematical concept or theorem it was designed to verify.
  Step 1: Draw line segment AB
  A ─────────────────────────── B
        (length = 8 cm)

  Step 2: Open compass > half AB. Draw arcs above & below from A
        *
       / \
  A ──/───\────────────────── B
      \   /
       \ /
        *

  Step 3: Repeat from B (same compass width). Arcs intersect at P & Q
        P
        |
  A ────┼──────────────────── B
        |
        Q

  Step 4: Draw line PQ — this is the perpendicular bisector of AB
  Midpoint M is where PQ crosses AB. Verify: AM = MB ✓
How to write a maths practical record 📓
Your maths practical record book is your official submission, and its structure is almost always the same regardless of the activity. A well-organised record earns presentation marks even before the examiner checks your construction.
Every record entry should contain these sections in order:
- Activity number & title — e.g. “Activity 3: To construct the perpendicular bisector of a given line segment”
- Aim / Objective — one sentence stating what you will do or verify
- Materials required — list every tool you used
- Procedure — numbered steps describing exactly what you did
- Observation / Result — measured values, calculated results, or data table
- Diagram / Graph — neat, labelled, drawn in pencil
- Conclusion — 2–3 sentences linking the result to the concept
Never write your procedure in past tense (“I drew a line”). Write it in present or imperative form (“Draw a line segment AB of length 8 cm”). This is the standard format examiners expect, and deviating from it can cost you presentation marks.
Worked example: bisecting a line segment 🔧
Here is a complete, mark-ready record entry for one of the most common maths practical activities — bisecting a line segment — so you can see exactly what a full submission looks like.
Activity: To construct the perpendicular bisector of a line segment of length 8 cm and verify that it divides the segment into two equal halves.
Aim: To draw the perpendicular bisector of AB where AB = 8 cm, and verify AM = MB.
Materials: Ruler (30 cm), compass, sharp pencil, plain A4 paper.
Procedure:
1. Draw a line segment AB = 8 cm.
2. Open the compass to a radius greater than 4 cm (more than half of AB).
3. Place the compass at A and draw arcs above and below AB.
4. Without changing the compass width, place it at B and draw arcs intersecting the first arcs at points P and Q.
5. Join P and Q with a straight line. Label the intersection with AB as M.
Observation: AM = 4 cm, MB = 4 cm. Angle PMB = 90°.
Conclusion: The line PQ bisects AB perpendicularly at M, confirming AM = MB = 4 cm and angle PMB = 90°. This verifies the property of a perpendicular bisector.
Notice that the conclusion explicitly states the numerical result and names the mathematical property it verifies. That two-part conclusion is what separates a full-mark answer from a partial one.
Maths practical vs maths exam: key differences ⚖️
Understanding how a maths practical differs from a written exam helps you prepare for each in the right way. They test different skills and reward different behaviours.
| Feature | Maths Practical | Written Maths Exam |
|---|---|---|
| Format | Hands-on construction, plotting, or data work | Written problem-solving under timed conditions |
| Tools allowed | Compass, ruler, protractor, graph paper | Calculator (where permitted), formula sheet |
| Marks awarded for | Process, accuracy, neatness, conclusion | Correct numerical answer, working shown |
| Time pressure | Moderate — accuracy matters more than speed | High — speed and accuracy both critical |
| Preparation method | Repeat constructions until hands are trained | Solve past papers, practise mental maths |
| Partial credit | Yes — correct steps earn marks even if final result is off | Yes — method marks for correct working |
| Record required? | Yes — record book submitted for marking | No — answer booklet only |
Common mistakes in maths practicals and how to avoid them 🚫
Most marks lost in maths practicals come from the same handful of errors. Here is a direct comparison of wrong versus right approaches for the most frequent mistakes.
| Mistake (Wrong) | Correct Approach |
|---|---|
| Using a blunt pencil for constructions | Use a sharp HB pencil — thin lines give accurate intersections |
| Erasing construction arcs to “tidy up” | Leave all arcs visible — they show your method and earn marks |
| Writing the procedure in past tense | Use imperative form: “Draw AB = 8 cm” |
| Plotting cumulative frequency at midpoints | Plot cumulative frequency at the upper class boundary |
| Skipping the conclusion | Always write a 2–3 sentence conclusion linking result to concept |
| Unlabelled diagram or graph axes | Label every point, line, angle, and axis — always |
| Changing compass width mid-construction | Lock the compass width and only change it when the step says to |
The single most mark-destroying habit I see is students erasing their construction arcs. I understand the impulse — it looks neater. But those arcs are your working. An examiner who sees a clean bisector with no arcs has no evidence you used a compass at all. Leave every arc exactly where it is. Neatness comes from precision, not erasure.
Pre-assessment preparation checklist ✅
Use this checklist the night before and the morning of your maths practical assessment. Tick every item before you leave home.
The night before:
- ☑ Revise the aim and procedure of the most likely activity types
- ☑ Practice at least one geometry construction on plain paper
- ☑ Check your compass — the needle should be firm, not loose
- ☑ Sharpen two pencils (one spare)
- ☑ Review your record book entries from previous practicals
- ☑ Confirm the date, time, and location of your assessment
On the day — tools to pack:
- ☑ Compass (with spare needle if possible)
- ☑ 30 cm ruler
- ☑ Protractor
- ☑ Set squares (45° and 60°)
- ☑ Two sharp HB pencils
- ☑ Eraser and pencil sharpener
- ☑ Scientific calculator
- ☑ Graph paper (at least 4 sheets)
- ☑ Plain A4 paper (at least 4 sheets)
- ☑ Maths practical record book
- ☑ Blue or black pen (for writing the record, not diagrams)
If your assessment allows you to bring a completed record book, read through your own entries the night before. Familiarity with your own handwriting and diagrams is one of the fastest ways to calm pre-assessment nerves and recall procedures under pressure.
What most guides get wrong about maths practicals: almost every guide tells you to “be neat and accurate” — but they don’t tell you where accuracy matters most. In a geometry construction, the critical precision point is the compass arc intersection, not the final drawn line. If your two arcs intersect cleanly at a single small region, your bisector or perpendicular will be accurate even if your final line is slightly wobbly. Students who focus on drawing a perfect final line while letting their arcs be sloppy get the opposite result. Train your compass hand first; the pencil line will follow.
For statistics practicals, the equivalent insight is this: the ogive (cumulative frequency curve) is only as accurate as your frequency table. Every guide tells you to plot carefully. Almost none tell you to double-check your running cumulative totals before you plot a single point. One arithmetic error in the table corrupts every subsequent point on the curve. Check the table twice; plot once.
Q1. When constructing a perpendicular bisector, which tool creates the intersecting arcs?
Show answer
✅ C — Compass. The compass draws arcs of equal radius from each endpoint. Where those arcs intersect gives you two points that define the perpendicular bisector.
Q2. In a cumulative frequency curve (ogive), the cumulative frequency is plotted against which value?
Show answer
✅ C — Upper class boundary. Cumulative frequency represents all values up to and including the upper boundary of each class, so that is the correct x-axis value to plot against.
Q3. Why should you NOT erase construction arcs in a geometry practical?
Show answer
✅ B — Arcs are your working. Without visible arcs, the examiner cannot confirm you used a compass correctly. Erasing them removes the evidence of your method and can cost you process marks.
Frequently asked questions about maths practical ❓
What is a maths practical?
What topics are covered in a maths practical?
What tools do I need for a maths practical?
How do I write a maths practical record?
Sources & References
Written and fact-checked by Dr Irfan Mansuri. External links open in a new tab and are provided for further reading and verification.