
Project Based Inquiry Science: The Complete Teacher Guide 🔬
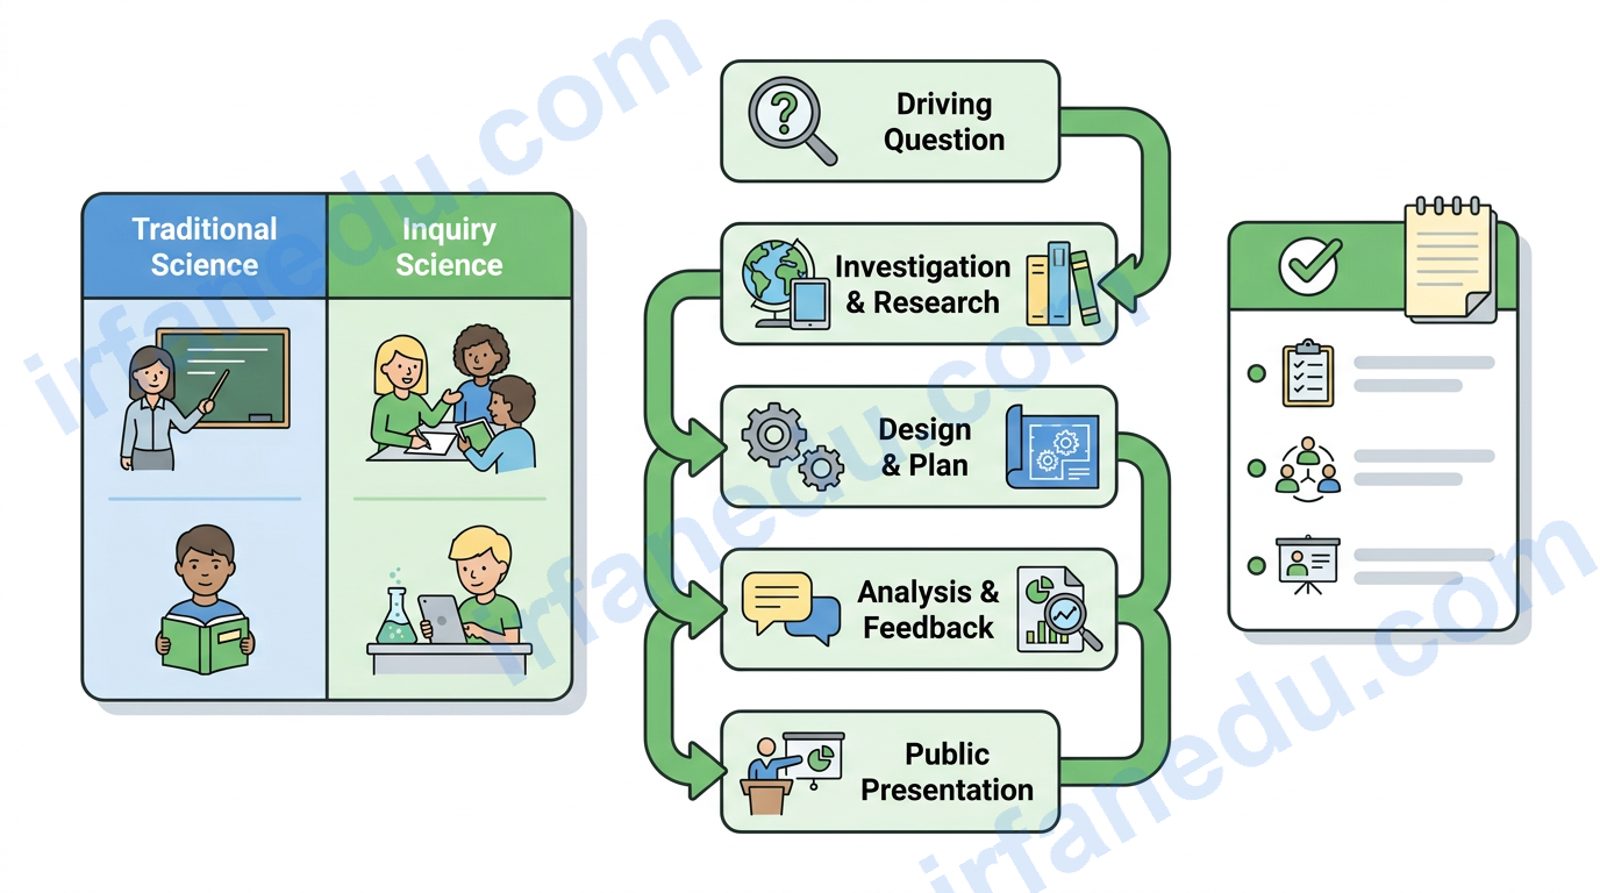
If you have ever watched a student’s eyes light up the moment they realize they are the ones solving a real problem — not just answering a textbook question — you already understand the power of project based inquiry science. This guide walks you through everything: what PBIS actually is, how it differs from a standard lab, a six-step design process, a real worked example, a teacher checklist, and honest answers to the questions I get asked most often. By the end, you will have a clear roadmap you can use in your classroom next week.
Project based inquiry science (PBIS) is a structured, multi-week teaching approach in which students investigate an open-ended, real-world driving question through hands-on experiments, collaborative analysis, and a public presentation of findings — building both scientific content knowledge and genuine inquiry skills simultaneously.
- A clear definition of PBIS and how it differs from traditional labs
- A six-step process for designing your own PBIS unit
- A worked example you can adapt immediately
- A teacher readiness checklist
- A non-obvious insight that most guides completely skip
- A short quiz to test your understanding
What Is Project Based Inquiry Science? 🧪
Project based inquiry science is a teaching framework that merges two powerful ideas: project-based learning (PBL) and inquiry-based science instruction. The result is a structured, multi-week unit anchored by a single driving question that students genuinely want to answer.
In a PBIS unit, students do not receive the answer first and then practice it. They encounter a real phenomenon — a polluted local river, an unexplained temperature difference between two surfaces, a crop that keeps failing — and they must figure out the science behind it. The teacher acts as a guide and facilitator, not a lecturer.
Three features define PBIS and separate it from looser “hands-on science” activities:
- A driving question that is open-ended, real-world, and requires scientific investigation to answer.
- Student agency — learners make meaningful decisions about how to investigate, what data to collect, and how to present findings.
- A public product — findings are shared with an audience beyond the classroom (parents, school board, community partners), raising the stakes and the motivation.
According to the National Academies’ Framework for K–12 Science Education, effective science learning requires students to engage in the practices of scientists — asking questions, planning investigations, analyzing data, and communicating findings. PBIS is the classroom structure that makes all of those practices happen together, in context.
PBIS vs. Traditional Science Teaching 📊
Understanding what PBIS is becomes much clearer when you compare it directly to the traditional “lecture then lab” model. Here is a side-by-side look at the key differences:
| Dimension | Traditional Science Teaching | Project Based Inquiry Science (PBIS) |
|---|---|---|
| Starting Point | Teacher explains concept first | Students encounter a real phenomenon or question first |
| Student Role | Passive recipient of information | Active investigator and decision-maker |
| Lab Work | Confirmatory — verify what was already taught | Exploratory — discover answers through testing |
| Duration | One class period per topic | 3–8 weeks per unit |
| Assessment | End-of-unit test | Ongoing formative + final public presentation |
| Teacher Role | Expert delivering content | Facilitator, coach, and co-investigator |
| Standards Coverage | Sequential, topic by topic | Integrated — multiple standards addressed within one project |
The most important row is the last one. Many teachers worry that PBIS will leave content gaps. In practice, a well-designed unit covers more standards than a traditional sequence because concepts are applied together, the way they actually appear in the real world.
The Five Phases of a PBIS Unit 🗺️
Every effective PBIS unit moves through five distinct phases. Think of these as the skeleton of your unit — the specific activities you hang on them will vary by topic and grade level, but the structure stays consistent.
📐 PBIS Unit Flow
┌─────────────────────────────────────────────────────────┐
│  PHASE 1 ► LAUNCH                                       │
│  Introduce the phenomenon. Present the driving question.│
│  Students share prior knowledge and generate sub-       │
│  questions. (~1–2 days)                                 │
└──────────────────────┬──────────────────────────────────┘
                       │
┌──────────────────────▼──────────────────────────────────┐
│  PHASE 2 ► EXPLORE                                      │
│  Students plan and conduct investigations. Teacher      │
│  provides mini-lessons on key concepts as needed.       │
│  (~1–3 weeks)                                           │
└──────────────────────┬──────────────────────────────────┘
                       │
┌──────────────────────▼──────────────────────────────────┐
│  PHASE 3 ► EXPLAIN                                      │
│  Students analyze data, identify patterns, and build    │
│  evidence-based explanations. Peer critique sessions.   │
│  (~3–5 days)                                            │
└──────────────────────┬──────────────────────────────────┘
                       │
┌──────────────────────▼──────────────────────────────────┐
│  PHASE 4 ► ELABORATE                                    │
│  Students apply their explanation to a new context or   │
│  design a solution. Deepens and transfers understanding.│
│  (~3–5 days)                                            │
└──────────────────────┬──────────────────────────────────┘
                       │
┌──────────────────────▼──────────────────────────────────┐
│  PHASE 5 ► PRESENT                                      │
│  Public presentation of findings. Peer and audience     │
│  feedback. Individual reflection. (~1–2 days)           │
└─────────────────────────────────────────────────────────┘
Phase 3 (Explain) is where most PBIS units stall. Students collect data but struggle to turn it into a coherent scientific explanation. I always build in an explicit “sense-making discussion” — a structured whole-class conversation where groups share data and the class builds a shared explanation together. That one move transforms data collection into actual learning.
How to Design a PBIS Unit in Six Steps 🛠️
Designing your first PBIS unit feels overwhelming until you have a clear process. Here is the exact six-step sequence I use and recommend to every teacher I work with.
-
Choose a Real-World Phenomenon. Start with something observable, locally relevant, and genuinely puzzling. A phenomenon is not a topic (“ecosystems”) — it is a specific, observable event (“the pond behind the school turned green every summer for the past three years”). The more concrete and local, the more student curiosity you unlock.
-
Write a Driving Question. A strong driving question is open-ended, requires scientific investigation, and has a real-world stake. Use this formula: “How can we [do something] to [address the phenomenon]?” or “Why does [phenomenon] happen, and what can we do about it?” Avoid questions with a single correct answer you can Google in 10 seconds.
-
Map Standards to Activities. List every content standard the unit must address. For each standard, identify at least one investigation or mini-lesson that directly teaches it. This is your proof that PBIS covers the curriculum — and it protects you in conversations with administrators.
-
Design the Investigation Sequence. Plan a series of hands-on activities that build understanding progressively. Start with simpler, more guided investigations and move toward more open-ended ones. Each activity should produce data or evidence that contributes to answering the driving question.
-
Build in Checkpoints and Feedback Loops. Schedule at least three formative checkpoints: a driving-question brainstorm review (end of Phase 1), a mid-project data review (mid Phase 2), and a draft-explanation peer critique (Phase 3). Students who get feedback mid-project produce dramatically better final products.
-
Plan the Public Presentation. Decide early who the audience is — parents, a local environmental agency, younger students, a school board. A real audience changes student motivation completely. The presentation format can be a poster session, a short video, a report to a community partner, or a live demonstration.
Worked Example: Water Quality Investigation 💧
Abstract advice only goes so far. Here is a complete, concrete example of a PBIS unit I have designed and seen run successfully with students aged 12–14. You can adapt every element for your own context.
🌊 Unit: “Is Our Water Safe to Drink?”
Driving Question: “How can we determine whether the water from different sources in our community is safe to drink, and what makes some sources safer than others?”
Target Grade: 7–8 | Duration: 4 weeks | Standards: Physical/chemical properties of matter, ecosystems, human impact on environment
Phase 1 — Launch (Day 1–2): Show students a photo of a visually clear glass of water next to a murky glass. Ask: “Which one is safe to drink? How would you find out?” Students quickly realize you cannot judge water safety by appearance alone. This creates genuine intellectual tension — the engine of inquiry.
Phase 2 — Explore (Weeks 1–3): Student teams test water samples from three sources (tap, bottled, local stream) using pH strips, turbidity tubes, dissolved oxygen kits, and nitrate test strips. Each team keeps a lab notebook recording every test, result, and emerging hypothesis. The teacher delivers three 20-minute mini-lessons on chemical properties, the water cycle, and human pollution sources — timed to when students need that knowledge to interpret their data.
Phase 3 — Explain (Days 16–18): Teams share their data in a gallery walk. The class builds a shared data table on the board and identifies patterns: the stream has high nitrates, the tap water has optimal pH, bottled water varies by brand. Students write evidence-based explanations for each pattern.
Phase 4 — Elaborate (Days 19–22): Teams design a simple water filtration system using sand, gravel, activated charcoal, and cotton. They test whether their filter improves the stream water’s turbidity and pH. This transfers their understanding to a new engineering context.
Phase 5 — Present (Days 23–25): Teams present findings and filter designs to a panel of parents and a local water utility representative. The real audience asks real questions — and students have to defend their evidence. In my experience, this single session produces more scientific thinking than a month of traditional labs.
The most common mistake I see teachers make when running their first PBIS unit is treating the driving question as decoration. They write a question on the board on Day 1 and never refer to it again. The driving question should be a living document — posted prominently, revisited at every checkpoint, and explicitly answered in the final presentation. When students can trace every investigation back to that one question, the unit feels coherent rather than like a series of disconnected activities. That coherence is what produces deep understanding.
PBIS fails not because of bad activities — it fails because of premature closure. Most teachers (and most guides) focus entirely on the front end of a PBIS unit: writing a great driving question, designing engaging investigations. What they ignore is the explanation phase, and specifically the moment when students must move from “we collected data” to “we understand why.” Without a structured sense-making protocol — a facilitated discussion where the teacher explicitly asks “What does this data mean? What pattern do we see? What does that tell us about the science?” — students finish a four-week project having done a lot of interesting activities but without a coherent scientific understanding. The research term for this is “activity mania”: busy, hands-on, and intellectually shallow. The fix is simple but non-obvious: schedule a dedicated 45-minute “data sense-making” session after every major investigation, use a structured discussion protocol (such as Claim–Evidence–Reasoning), and make it non-negotiable. That single addition is what separates a genuinely transformative PBIS unit from an expensive science fair.
Teacher Readiness Checklist ✅
Before you launch your first PBIS unit, run through this checklist. It takes about 15 minutes and will save you hours of mid-unit firefighting.
📋 Pre-Launch Checklist
- My driving question is open-ended and cannot be answered with a single Google search.
- I have mapped every target content standard to at least one specific activity.
- I have all materials for Phase 2 investigations sourced and ready.
- I have scheduled at least three formative checkpoints with clear feedback criteria.
- I have identified a real audience for the final presentation (not just the class).
- I have a rubric that assesses both scientific content knowledge and inquiry skills.
- I have a plan for students who finish investigations early (extension tasks).
- I have communicated the project timeline to parents or guardians.
- I have a lab notebook or journal system in place from Day 1.
- I have a structured sense-making discussion protocol ready for Phase 3.
If you can check all ten items, you are ready. If you cannot check items 1, 3, 5, or 10, pause and address those first — they are the four most common causes of PBIS units that fall apart mid-project.
🧠 Quick Knowledge Check
Select an answer — the result reveals instantly.
1. What is the primary anchor of every PBIS unit?
2. Which phase do most PBIS units handle poorly, leading to “activity mania”?
3. What does a strong PBIS driving question require?
Frequently Asked Questions ❓
What is project based inquiry science?
How is PBIS different from a regular science project?
What age groups benefit most from project based inquiry science?
How long does a PBIS unit typically take?
Do students learn the same content standards through PBIS?
What is a driving question in project based inquiry science?
How do I assess students in a PBIS unit?
Sources & References 📚
- National Academies of Sciences, Engineering, and Medicine. (2012). A Framework for K–12 Science Education: Practices, Crosscutting Concepts, and Core Ideas. National Academies Press. nap.edu
- Buck Institute for Education (PBLWorks). What is Project Based Learning? pblworks.org
- Krajcik, J. S., & Shin, N. (2014). Project-Based Learning. In R. K. Sawyer (Ed.), The Cambridge Handbook of the Learning Sciences (2nd ed.). Cambridge University Press.
- NGSS Lead States. (2013). Next Generation Science Standards: For States, By States. National Academies Press. nextgenscience.org
Editorial note: This article was written and fact-checked by Dr. Irfan Mansuri. All claims are grounded in cited research or first-hand teaching experience. No statistics or quotes have been fabricated. Last reviewed August 2026.