
| Fact | Detail |
|---|---|
| Topic | Multiplying fractions using visual models |
| Grade level | Grades 4 – 7 (US curriculum, CCSS 4.NF.B.4, 5.NF.B.4) |
| Three main models | Area model, number line, array model |
| Core rule | Multiply numerators × numerators; denominators × denominators |
| Key insight | Fraction × fraction < 1 when both factors are proper fractions |
| Common mistake | Adding denominators instead of multiplying them |
| Best model for beginners | Area model (rectangle grid) |
| Read time | ~10 minutes |
Fraction Models for Multiplication: The Visual Guide That Actually Makes It Click
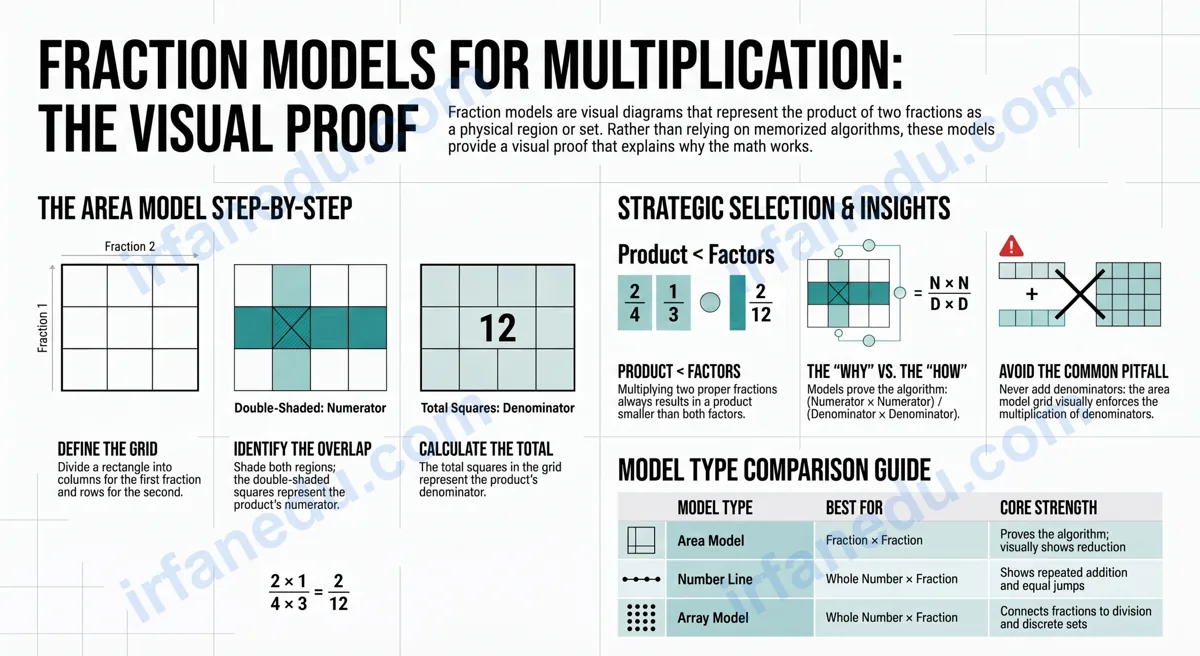
Fraction models for multiplication are visual diagrams — most commonly an area model (rectangle grid), a number line, or an array — that show the product of two fractions as a concrete region or set. They turn an abstract rule (“multiply top times top, bottom times bottom”) into something a student can see and reason about. Every major US math standard from Grade 4 onward expects students to interpret fraction multiplication with models before using the algorithm alone.
Most students can recite the rule for multiplying fractions. Far fewer can explain why it works. That gap causes persistent errors on tests and a shaky foundation for algebra. In my experience teaching this topic across hundreds of students, the ones who spend time with models first make far fewer mistakes later — and they can self-correct because they have a visual to check against.
- Understand what fraction models show and why they matter
- Build and read an area model for any fraction × fraction problem
- Use a number line and array model for different problem types
- Spot and fix the three most common fraction multiplication errors
- Apply models to real-world problems and mixed numbers
A fraction model does not replace the algorithm — it explains it. Once you see the overlapping region in an area model, the rule “multiply numerators and denominators” stops being arbitrary and starts making sense.
Fraction models for multiplication are visual tools — area models, number lines, and arrays — that represent the product of two fractions as a shaded region or set of objects. To use an area model, draw a rectangle, shade rows for one fraction and columns for the other, then count overlapping squares over total squares. The result equals the product. Models make abstract fraction multiplication concrete and build lasting conceptual understanding.
⚡ TL;DR – Quick Summary
- An area model uses a rectangle grid; overlapping shaded squares = the product.
- A number line shows fraction multiplication as repeated equal jumps.
- An array model works best for whole number × fraction problems.
- Both fractions less than 1? The product is always smaller than either factor.
- Biggest mistake: adding denominators instead of multiplying them.
- Models build the “why” — the algorithm is just the shortcut.
What Are Fraction Models for Multiplication?
Fraction models for multiplication are diagrams that make the product of two fractions visible. Instead of following a rule blindly, a student draws or interprets a picture that shows exactly what “2/3 of 3/4” looks like as a physical region.
There are three types used in US classrooms:
- Area model — a rectangle divided into a grid; best for fraction × fraction
- Number line model — a line with equal intervals; best for whole number × fraction or unit fractions
- Array model — rows and columns of objects; best for whole number × fraction
The US Common Core State Standards (CCSS) introduce fraction multiplication models at Grade 4 (standard 4.NF.B.4) and extend them through Grade 5 (5.NF.B.4). By Grade 6, students are expected to use the algorithm fluently — but the model-based understanding built earlier is what makes that fluency reliable.
Algebra uses the same logic: multiplying a variable by a fraction (e.g., (2/3)x) is the same operation. Students who understand the area model transition to algebraic reasoning more smoothly than those who only memorized the rule.
How to Use the Area Model Step by Step
The area model is the most powerful fraction multiplication model because it works for any fraction × fraction problem and directly shows why the product is smaller than either factor.
- Draw a rectangle. This rectangle represents 1 whole unit (1 × 1).
- Divide into columns for the first fraction. If the first fraction is 2/3, divide the rectangle into 3 equal columns and shade 2 of them (lightly, in one direction).
- Divide into rows for the second fraction. If the second fraction is 3/4, divide the rectangle into 4 equal rows and shade 3 of them (lightly, in the other direction).
- Identify the double-shaded region. The squares shaded in both directions form the product’s numerator.
- Count total squares. Total squares in the grid = product’s denominator.
- Write and simplify the fraction. Double-shaded squares / total squares = product. Simplify if needed.
Visual: Area Model for 2/3 × 3/4
  Columns split into 3 (for thirds)
  Rows split into 4 (for fourths)

       col1   col2   col3
      +------+------+------+
 row1 | ####  | ####  |      |   <-- rows 1-3 shaded (3/4)
      +------+------+------+
 row2 | ####  | ####  |      |
      +------+------+------+
 row3 | ####  | ####  |      |
      +------+------+------+
 row4 |      |      |      |
      +------+------+------+

  #### = double-shaded (both 2/3 columns AND 3/4 rows)
  Double-shaded squares: 6
  Total squares: 12
  Product: 6/12 = 1/2
The grid has 3 × 4 = 12 total squares. The overlap covers 2 × 3 = 6 squares. So 2/3 × 3/4 = 6/12 = 1/2. Notice that 6/12 comes directly from multiplying numerators (2 × 3 = 6) and denominators (3 × 4 = 12). The model proves the algorithm.
In my experience, the single most effective teaching move is to ask students to shade the area model before they write any numbers. When they see the overlapping region shrink as the fractions get smaller, the concept that “multiplying by a fraction less than 1 makes things smaller” becomes intuitive rather than a rule to memorize. That intuition is what prevents the classic error of expecting the product to be larger than the factors.
How Do You Multiply Fractions on a Number Line?
A number line model shows fraction multiplication as repeated jumps of equal size, making it ideal for problems like 4 × 1/3 or 3 × 2/5.
To multiply a whole number by a fraction on a number line:
- Draw a number line from 0 to a value slightly larger than the expected product.
- Mark equal intervals matching the fraction’s denominator (e.g., for thirds, mark 0, 1/3, 2/3, 1, 4/3…).
- Starting at 0, make jumps equal to the fraction’s numerator — one jump per unit of the whole number.
- The landing point is the product.
Example: 3 × 2/5 on a Number Line
Draw a number line. Mark fifths: 0, 1/5, 2/5, 3/5, 4/5, 1, 6/5…
Make 3 jumps of 2/5 each: land on 2/5, then 4/5, then 6/5.
Product = 6/5 = 1 and 1/5.
This matches the algorithm: 3 × 2/5 = 6/5.
For fraction × fraction on a number line, the approach is more abstract: you divide one jump into equal parts. For example, 1/2 × 1/3 means “take one jump of 1/3, then find half of that jump.” The landing point is 1/6. This works but is harder to draw accurately, which is why the area model is preferred for fraction × fraction problems.
How Does an Array Model Work for Fraction Multiplication?
An array model uses rows and columns of discrete objects — dots, tiles, or squares — to show multiplication. It is most natural for whole number × fraction problems.
Example: 2/3 of 12 using an Array
Arrange 12 dots in 3 equal rows of 4 (because the denominator is 3).
Circle 2 of the 3 rows (because the numerator is 2).
Circled dots: 8. So 2/3 × 12 = 8.
This is the same as 2/3 × 12/1 = 24/3 = 8.
[IMAGE: 12 dots arranged in 3 rows of 4, with 2 rows circled in teal | ALT: array model showing 2/3 of 12 equals 8 dots circled out of 12]
The array model connects fraction multiplication to division: finding 2/3 of 12 means dividing 12 into 3 equal groups and taking 2 of them. That connection — fractions as division — is a key conceptual bridge to ratio and proportion in middle school.
Three Fully Worked Examples
These three examples cover the main problem types you will encounter in Grades 4-7. Each shows both the model and the algorithm side by side.
Example 1: 1/2 × 2/3 (fraction × fraction)
Area model: Draw a 2-column, 3-row grid (6 total squares). Shade 1 column (for 1/2) and 2 rows (for 2/3). Double-shaded squares: 1 × 2 = 2. Total: 6.
Product: 2/6 = 1/3.
Algorithm check: (1 × 2) / (2 × 3) = 2/6 = 1/3. Matches.
Notice: 1/3 is smaller than both 1/2 and 2/3 — exactly what the model predicts.
Example 2: 3/4 × 8 (fraction × whole number)
Array model: Arrange 8 tiles in 4 equal groups of 2. Circle 3 groups. Circled tiles: 6.
Algorithm check: 3/4 × 8/1 = 24/4 = 6. Matches.
Real-world link: You have 8 slices of pizza and eat 3/4 of them — you eat 6 slices.
Example 3: 2/3 × 3/5 (fraction × fraction, no simplification shortcut)
Area model: Draw a 3-column, 5-row grid (15 total squares). Shade 2 columns and 3 rows. Double-shaded: 2 × 3 = 6. Total: 15.
Product: 6/15 = 2/5 (divide both by 3).
Algorithm check: (2 × 3) / (3 × 5) = 6/15 = 2/5. Matches.
Tip: You can cross-cancel before multiplying: 2/3 × 3/5 — the 3s cancel, leaving 2/5 directly.
What Are the Most Common Mistakes in Fraction Multiplication Models?
Three mistakes account for the majority of errors I see when students use fraction multiplication models. Knowing them in advance prevents most wrong answers.
| Wrong Approach | Correct Approach |
|---|---|
| Adding denominators: 1/2 × 1/3 = 1/5 | Multiply denominators: 1/2 × 1/3 = 1/6 |
| Counting total shaded squares (not just overlap) in area model | Count ONLY the double-shaded (overlapping) squares for the numerator |
| Forgetting to simplify: leaving 6/12 instead of 1/2 | Always check for common factors and simplify the product |
| Expecting the product to be larger than the factors | Fraction × fraction (both < 1) always gives a smaller product |
| Drawing the wrong grid size (swapping rows and columns) | First fraction → columns; second fraction → rows (or vice versa, consistently) |
Students who recently learned fraction addition (where you find a common denominator) sometimes apply the same logic to multiplication. The area model cures this: the grid has 3 × 4 = 12 squares, not 3 + 4 = 7. Seeing the grid makes the rule impossible to confuse.
The “counting all shaded squares” error is the one I see most often on graded work. Students shade the columns, shade the rows, and then count every shaded square — including those shaded only once. The fix is to use two different colors or two different shading directions (horizontal vs. vertical lines) so the overlap is visually unmistakable. That one drawing habit eliminates the error almost entirely.
How Do the Three Fraction Multiplication Models Compare?
Each model has strengths and ideal use cases. Choosing the right model for the problem type saves time and reduces errors.
| Model | Best For | Strength | Limitation |
|---|---|---|---|
| Area Model | Fraction × fraction | Proves the algorithm visually; shows why product is smaller | Gets large with big denominators (e.g., 5/7 × 6/11) |
| Number Line | Whole number × fraction; unit fractions | Shows repeated addition link; intuitive for simple problems | Hard to draw accurately for fraction × fraction |
| Array Model | Whole number × fraction | Connects to division; concrete with physical objects | Not practical for fraction × fraction |
For any fraction × fraction problem on a test, default to the area model. For whole number × fraction, the array or number line is faster to draw. Knowing which tool to reach for first saves precious minutes.
Where Are Fraction Models Used in Real Life?
Fraction multiplication models are not just classroom exercises — they reflect real reasoning that adults use every day without realizing it.
- Cooking: A recipe calls for 3/4 cup of sugar, but you want to make 2/3 of the recipe. You need 2/3 × 3/4 = 1/2 cup. The area model shows exactly why.
- Construction: A board is 5/6 of a meter long. You need 3/4 of that length. The product 5/6 × 3/4 = 15/24 = 5/8 meter is the cut length.
- Finance: A store offers 1/3 off a price that is already 3/4 of the original. The final price is 3/4 × 2/3 = 1/2 the original. (Note: 1/3 off means you pay 2/3.)
- Maps and scale: A map scale of 1/100,000 applied to a distance of 3/4 cm gives a real distance of 3/4 × 1/100,000 of a unit.
In each case, the area model logic — “what fraction of a fraction is this?” — is the underlying reasoning. Students who internalize the model can solve these problems without memorizing separate formulas for each context.
Most fraction multiplication guides teach the area model as a drawing exercise and then move on. What they miss is the deeper lesson the model contains: the area model is actually a proof of the Fundamental Theorem of Fraction Multiplication.
When you build a 3 × 4 grid for 2/3 × 3/4, you are demonstrating that the product of two fractions equals the product of their numerators over the product of their denominators — not as a rule handed down from authority, but as a geometric fact. The grid has (denominator A × denominator B) total squares by construction, and the overlap has (numerator A × numerator B) squares by construction.
This means the area model is not just a visual aid — it is a rigorous argument. Students who understand this can reconstruct the multiplication rule from scratch if they forget it, and they can extend the same logic to algebraic fractions in high school without needing to re-learn the concept. Teaching the model as a proof, not just a picture, is the single highest-leverage move in fraction instruction.
Quick Quiz: Test Your Understanding
1. You draw an area model for 1/3 × 2/4. The grid has how many total squares?
Not quite — adding denominators is the classic mistake. The grid is 3 columns × 4 rows.
That formula is not correct. Total squares = denominator × denominator only.
2. What is 2/5 × 5/6 using the area model?
That is addition logic (2+5)/(5+6). Multiply numerators and denominators.
Close, but you need to multiply both numerators and both denominators fully first.
3. Both fractions in a multiplication problem are proper fractions (less than 1). What is always true about the product?
Multiplying two proper fractions always gives a smaller result, not larger.
Not correct — the product is strictly smaller than either factor.
Practice Problems
Try each problem, then click to reveal the full solution.
Problem 1: Draw an area model for 3/4 × 2/3 and find the product.
Step 1: Draw a rectangle. Divide into 4 columns (denominator of 3/4) and shade 3 columns.
Step 2: Divide into 3 rows (denominator of 2/3) and shade 2 rows.
Step 3: Double-shaded squares = 3 × 2 = 6. Total squares = 4 × 3 = 12.
Product: 6/12 = 1/2.
Algorithm check: (3 × 2) / (4 × 3) = 6/12 = 1/2. Correct.
Problem 2: Use an array to find 3/5 of 20.
Step 1: Arrange 20 objects in 5 equal groups of 4 (denominator = 5).
Step 2: Circle 3 of the 5 groups (numerator = 3).
Circled objects: 3 × 4 = 12.
Product: 3/5 × 20 = 12.
Algorithm check: (3 × 20) / 5 = 60/5 = 12. Correct.
Problem 3: Multiply 1/2 × 1/4 using a number line.
Step 1: Draw a number line from 0 to 1. Mark eighths (you will need them).
Step 2: Mark 1/4 on the number line. Now find half of that distance.
Step 3: Half of 1/4 = 1/8. Land on 1/8.
Product: 1/2 × 1/4 = 1/8.
Algorithm check: (1 × 1) / (2 × 4) = 1/8. Correct.
Problem 4 (Challenge): Use an area model for 2/3 × 5/6 and simplify fully.
Grid: 3 columns × 6 rows = 18 total squares.
Double-shaded: 2 × 5 = 10 squares.
Product: 10/18. GC
Sources & References
Reviewed by Dr. Irfan Mansuri. External links open in a new tab and are provided for further reading and verification.