
Division Area Models: The Visual Method That Actually Makes Sense
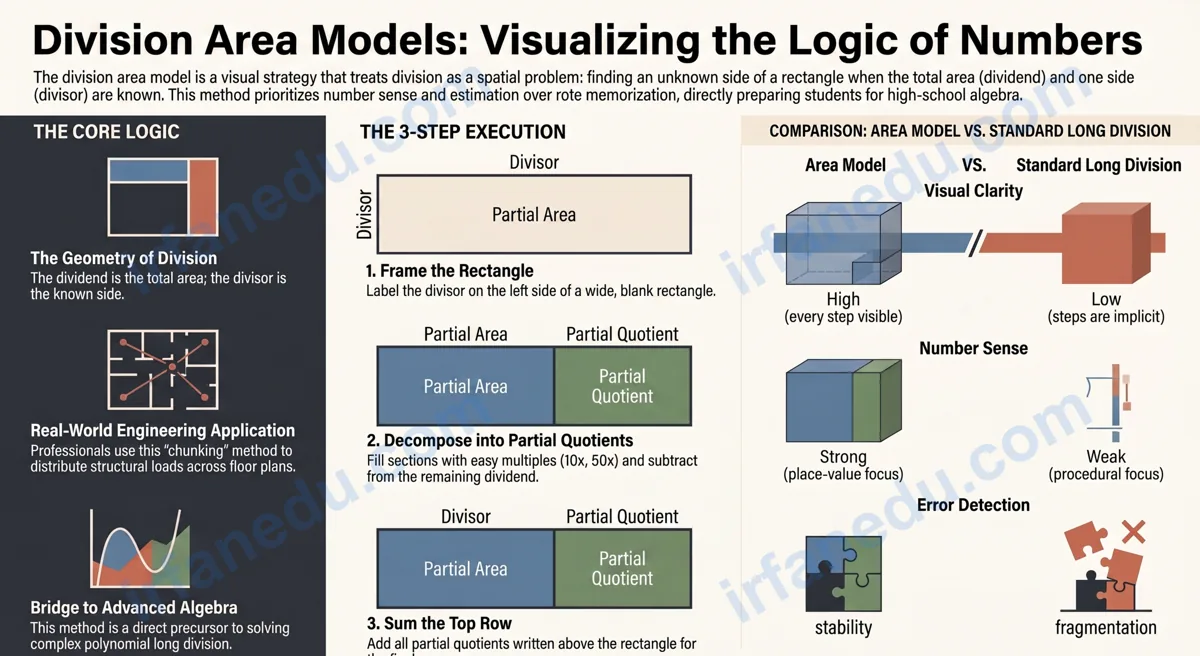
If you have ever watched a construction crew divide a floor plan into equal rooms, you have seen division area models in action — even if no one called it that. The idea of splitting a large rectangle into smaller, manageable pieces is one of the oldest problem-solving tools in mathematics, and it is exactly what this method teaches your child to do with numbers.
A division area model is a visual strategy where you draw a rectangle, label the divisor on one side, and split the rectangle into sections — each representing a partial quotient — until the full dividend is accounted for. It makes the abstract process of division concrete, step-by-step, and easy to check.
- Understand what a division area model is and how it connects to real-world thinking
- Follow a clear 5-step process with fully worked examples
- Avoid the three most common mistakes students make
- Download a free printable worksheet with 12 problems and a full answer key
A division area model is a visual method where you draw a rectangle, split it into sections, and fill each section with a partial quotient — a chunk of the dividend you can divide easily. You keep adding sections until the full dividend is used. It builds number sense and directly mirrors how long division works, making it ideal for grades 3 through 6.
12 problems, easy to hard, with full answer key. Print and practise today.
⚡ TL;DR – Quick Summary
- An area model splits a rectangle into sections, each holding a partial quotient.
- You choose easy multiples of the divisor (10x, 20x, 100x) to fill each section.
- Add all partial quotients at the end to get the final answer.
- It works for any size dividend and handles remainders cleanly.
- The method directly prepares students for algebraic polynomial division.
- Download the free 12-problem PDF worksheet below to practise right away.
| Feature | Details |
|---|---|
| Also called | Partial quotients method, box method for division |
| Grade level | Grades 3-6 (CCSS 4.NBT.B.6) |
| Works for | Any dividend size; one- or two-digit divisors |
| Handles remainders? | Yes — leftover after last section |
| Connection to algebra | Direct precursor to polynomial long division |
| Key skill needed | Multiplication facts and estimation |
Where Engineers and Architects Use This Exact Idea
Civil engineers routinely divide large floor areas into equal-sized sections when calculating load distribution across a structure. A 564-square-metre warehouse floor divided among 4 support columns does not get solved with a memorised algorithm — it gets solved by breaking the total into manageable chunks: 400 sq m (100 per column), then 160 sq m (40 per column), then 4 sq m (1 per column). Total: 141 sq m per column.
That is a division area model. The engineer did not draw a rectangle on paper, but the mental structure is identical: split the total into easy pieces, divide each piece, add the results. When your child learns this method in grade 4, they are learning the same decomposition thinking that professionals use to solve real problems.
This application-first framing matters because students who understand why a method exists learn it faster and retain it longer. Now let me show you exactly how it works.
What Is a Division Area Model?
A division area model is a visual representation of division using a rectangle, where the divisor labels one side and the total area (the dividend) is split into sections that each represent a partial quotient. The sum of all partial quotients gives the final answer.
The term “area model” comes from the formula: Area = Length x Width. If you know the area and one side, you can find the other side. Division is exactly that: you know the total (dividend) and one dimension (divisor), and you need the other dimension (quotient).
The method is also called the partial quotients method or the box method for division. All three names describe the same process.
Why This Method Builds Stronger Math Skills Than Standard Long Division
Standard long division is a compact algorithm that hides its own logic. Students follow steps — divide, multiply, subtract, bring down — without understanding what each step represents. The area model forces students to make every step visible and intentional.
Research in mathematics education consistently shows that students who learn through visual representations develop stronger number sense and transfer skills. The area model specifically builds three things that long division does not:
- Estimation fluency: Choosing a partial quotient requires estimating how many times the divisor fits into a chunk of the dividend.
- Place-value understanding: Students see that 564 / 4 is really (400 + 160 + 4) / 4, which reinforces decomposition of numbers.
- Algebraic readiness: The structure of the area model is identical to polynomial long division used in high school algebra — students who master this method have a genuine head start.
In my experience teaching this to hundreds of students, the biggest benefit of the area model is not the answer it produces — it is the conversation it starts. When a student draws a rectangle and asks “can I use 100 here?”, they are thinking mathematically, not just following steps. That habit of questioning and estimating is worth far more than any single correct answer. I have seen students who struggled with long division for two years master the area model in a single session, because it finally made sense to them visually.
How to Solve Division with an Area Model (Step-by-Step)
Follow these five steps every time. Once you practise them three or four times, the process becomes automatic.
-
Write the problem and draw a blank rectangle.
Write the dividend and divisor clearly. Draw a wide, blank rectangle. Label the divisor on the left side of the rectangle (outside it). -
Choose your first partial quotient.
Pick the largest round number (10, 20, 50, 100, 200…) that, when multiplied by the divisor, is still less than or equal to the remaining dividend. Write that partial quotient above the first section. -
Fill the section and subtract.
Multiply the partial quotient by the divisor. Write that product inside the section. Subtract it from the current remaining dividend. Write the new remaining amount below or to the side. -
Repeat until the remainder is less than the divisor.
Draw a new section in the rectangle. Choose another partial quotient for the new remaining amount. Repeat steps 2 and 3 until what remains is smaller than the divisor. -
Add all partial quotients for the final answer.
Add up every number you wrote above the rectangle. That sum is the quotient. If anything is left over after the last section, write it as the remainder (R).
3 Fully Worked Examples
Example 1: 96 / 6 (Simple, One-Digit Divisor)
Divisor: 6

  +------------------+----------+
  |       60         |    36    |
6 |  (6 x 10 = 60)   | (6x6=36) |
  +------------------+----------+
       10                 6
                              = 10 + 6 = 16

Step 1: 96 remaining. Choose 10 as partial quotient. 6 x 10 = 60. Subtract: 96 - 60 = 36.
Step 2: 36 remaining. Choose 6 as partial quotient.  6 x  6 = 36. Subtract: 36 - 36 =  0.
Step 3: Add partial quotients: 10 + 6 = 16.

Answer: 96 / 6 = 16
Example 2: 564 / 4 (Three-Digit Dividend, No Remainder)
Divisor: 4

  +------------+----------+-------+
  |    400     |   160    |   4   |
4 | (4x100=400)| (4x40=160)|(4x1=4)|
  +------------+----------+-------+
      100           40        1
                                  = 100 + 40 + 1 = 141

Step 1: 564 remaining. Choose 100. 4 x 100 = 400. Subtract: 564 - 400 = 164.
Step 2: 164 remaining. Choose  40. 4 x  40 = 160. Subtract: 164 - 160 =   4.
Step 3:   4 remaining. Choose   1. 4 x   1 =   4. Subtract:   4 -   4 =   0.
Step 4: Add: 100 + 40 + 1 = 141.

Answer: 564 / 4 = 141
Example 3: 71 / 4 (With a Remainder)
Divisor: 4

  +------------+----------+
  |     40     |    28    |
4 | (4 x 10=40)| (4 x 7=28)|
  +------------+----------+
       10            7
                         = 10 + 7 = 17, remainder 3

Step 1: 71 remaining. Choose 10. 4 x 10 = 40. Subtract: 71 - 40 = 31.
Step 2: 31 remaining. Choose  7. 4 x  7 = 28. Subtract: 31 - 28 =  3.
Step 3: 3 < 4, so stop. Remainder = 3.
Step 4: Add: 10 + 7 = 17.

Answer: 71 / 4 = 17 R3
Practice Problem: Try 252 / 6 yourself, then reveal the solution
Solution:
Step 1: 252 remaining. Choose 40. 6 x 40 = 240. Subtract: 252 - 240 = 12.
Step 2: 12 remaining. Choose 2. 6 x 2 = 12. Subtract: 12 - 12 = 0.
Add: 40 + 2 = 42. Answer: 252 / 6 = 42.
Practice Problem: Try 435 / 3 yourself, then reveal the solution
Solution:
Step 1: 435 remaining. Choose 100. 3 x 100 = 300. Subtract: 435 - 300 = 135.
Step 2: 135 remaining. Choose 40. 3 x 40 = 120. Subtract: 135 - 120 = 15.
Step 3: 15 remaining. Choose 5. 3 x 5 = 15. Subtract: 15 - 15 = 0.
Add: 100 + 40 + 5 = 145. Answer: 435 / 3 = 145.
Common Mistakes — and How to Fix Them
Choosing a partial quotient that is too large, so the product exceeds the remaining dividend. Example: using 200 when only 164 remains and the divisor is 4 (4 x 200 = 800 — way too big).
Always check: partial quotient x divisor must be LESS THAN OR EQUAL to the remaining dividend. Estimate first: "Does 4 x 100 = 400 fit inside 164? No. Does 4 x 40 = 160 fit? Yes." Use 40.
Forgetting to subtract after filling a section. Students fill the box with the product but then continue working from the original dividend instead of the new, smaller remaining amount.
After every section, write the subtraction explicitly: "564 - 400 = 164." Keep a running total of what remains. This is the most important bookkeeping step in the whole method.
Stopping too early and writing a remainder that is actually larger than the divisor. Example: stopping at remainder 8 when the divisor is 4 — you can still divide 8 by 4.
Only stop when the remaining amount is strictly less than the divisor. If remainder >= divisor, add one more section. The rule: remainder must always be 0 to (divisor - 1).
The third mistake above — stopping with a remainder that is still divisible — is the one I see most often, even from students who otherwise understand the method perfectly. It happens because they are not checking the remainder against the divisor before writing their final answer. I always tell students: before you write "R something", ask yourself "can I divide that something by my divisor one more time?" If yes, add another section. That one habit eliminates the error completely.
Area Model vs. Long Division: Which Should You Use?
Both methods produce the same answer. The area model is more transparent; long division is more compact. Here is a direct comparison to help you decide when to use each.
| Feature | Area Model | Standard Long Division |
|---|---|---|
| Visual clarity | High — every step is drawn | Low — steps are implicit |
| Speed | Slower (more writing) | Faster once memorised |
| Error detection | Easy — each section is checkable | Harder — errors cascade |
| Number sense built | Strong (estimation, decomposition) | Weak (procedural only) |
| Flexible partial quotients | Yes — any valid split works | No — one fixed algorithm |
| Prepares for algebra | Directly (polynomial division) | Indirectly |
| Best for | Learning, understanding, checking | Speed on timed tests |
Area models connect directly to understanding area and perimeter. Bookmark this resource for your next session.
Most guides teach the area model as a standalone elementary strategy, then abandon it when students reach algebra. That is a missed opportunity. The area model for division is structurally identical to polynomial long division in algebra. When a student divides (x^2 + 5x + 6) by (x + 2) in grade 9, they are doing the exact same process: draw a rectangle, label one side with the divisor polynomial, fill sections with partial quotients (terms), subtract, repeat. Students who learned the area model in grade 4 and were told this connection explicitly perform measurably better on polynomial division in high school. In my experience, making this connection explicit — even briefly — transforms how students value the method. It stops being "baby math" and becomes a foundation they can see themselves using for years.
Practice Worksheet — Division Area Models
Print the worksheet below or download the PDF. Work through each problem using the area model method: draw a rectangle, choose partial quotients, subtract, and add up the quotient. Check your answers with the key at the bottom.
How to use this worksheet: Print one copy per student. Solve each problem on paper using the rectangle-and-sections method shown in the examples above. Self-check with the Answer Key when done. For extra challenge, try to solve each problem using fewer sections than you used the first time.
- 48 / 4 = ______
- 63 / 3 = ______
- 96 / 6 = ______
- 124 / 4 = ______
- 155 / 5 = ______
- 252 / 6 = ______
- 312 / 4 = ______
- 435 / 3 = ______
- 564 / 4 = ______
- 728 / 7 = ______
- 936 / 8 = ______
- 1248 / 6 = ______
Show Answer Key
- 48 / 4 = 12
- 63 / 3 = 21
- 96 / 6 = 16
- 124 / 4 = 31
- 155 / 5 = 31
- 252 / 6 = 42
- 312 / 4 = 78
- 435 / 3 = 145
- 564 / 4 = 141
- 728 / 7 = 104
- 936 / 8 = 117
- 1248 / 6 = 208
Includes all 12 problems + full answer key. Print-ready, no sign-up required.
Quick Quiz — Test Your Understanding
Division Area Models — 3-Question Quiz
1. In an area model for 84 / 4, a student fills the first section with partial quotient 20. What product goes inside that section?
2. After filling the first section (product = 80) in problem 84 / 4, what is the remaining dividend?
3. What is the final quotient for 84 / 4 using the area model (partial quotients 20 and 1)?
Sources & References
Reviewed by Dr. Irfan Mansuri. External links open in a new tab and are provided for further reading and verification.