
— A principle that still drives every geometry class today
Compass Geometry: The Complete Guide Every Student Needs 🧭
📋 Table of Contents
- What Is Compass Geometry?
- What Tools Do You Need?
- 6 Core Constructions Step-by-Step
- Visual Solution: Perpendicular Bisector
- Worked Examples You Can Follow
- Common Mistakes (and How to Fix Them)
- Compass vs. Protractor vs. Ruler
- 💡 Unique Insight: The Impossible Constructions
- Quick Quiz
- Practice Problems
- FAQ
- Sources & References
Most students pick up a compass for the first time and immediately wobble the pivot, scratch a lopsided arc, and give up. I have watched this happen in classrooms for 15 years. The frustrating part? Compass geometry is not hard — it just needs a clear mental model and a handful of practised moves. Once you have those, every construction clicks into place.
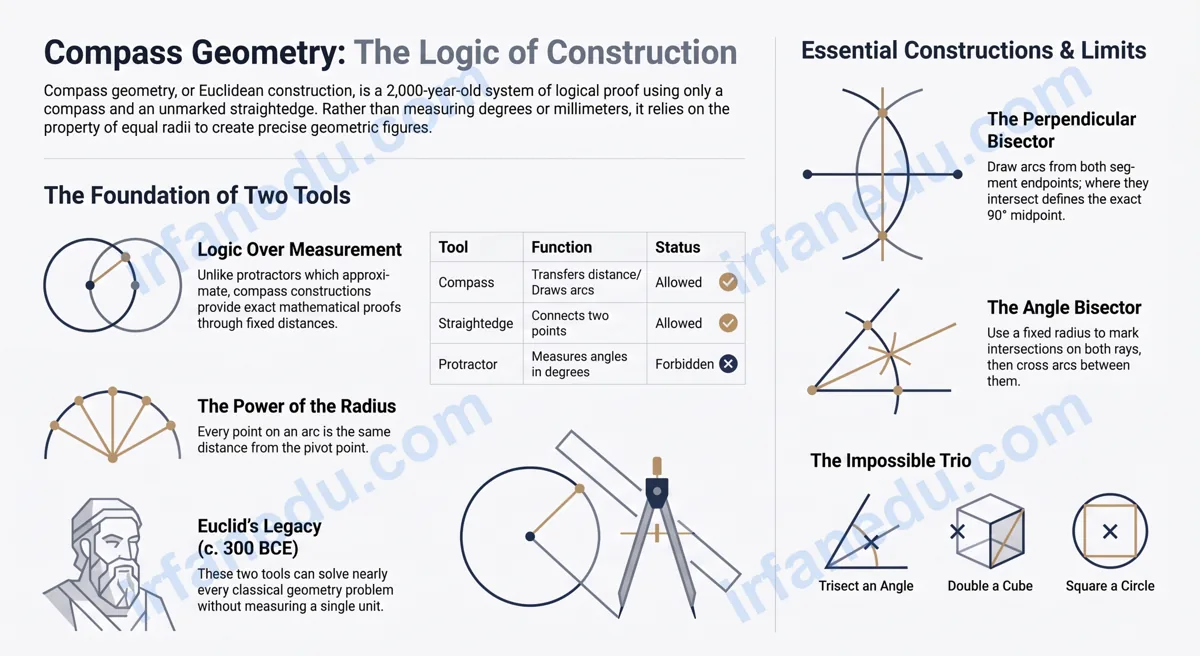
Compass geometry is the practice of constructing exact geometric figures — bisectors, perpendiculars, circles, and regular polygons — using only a compass and a straightedge. The compass fixes a radius so you can mark equal distances; the straightedge connects points. Together, these two tools can solve every classical Euclidean construction problem without measuring a single degree or millimetre.
- 🎯 Understand what a compass actually does (and what it cannot do)
- 📐 Follow clear step-by-step instructions for 6 essential constructions
- 🔍 See worked examples with ASCII diagrams you can replicate on paper
- ⚠️ Spot and fix the 5 most common compass mistakes
- 🧩 Test yourself with a 3-question quiz and reveal-on-click problems
⚡ TL;DR – Quick Summary
- 🧭 A compass draws arcs of a fixed radius; a straightedge connects points.
- 📐 Six constructions cover 90% of school geometry: perpendicular bisector, angle bisector, parallel line, 60° angle, equilateral triangle, hexagon.
- 🔒 Keep the compass width locked between steps — changing it accidentally ruins the construction.
- ⚠️ A protractor measures angles; a compass constructs them — they are not interchangeable.
- 🚫 Trisecting a general angle is mathematically impossible with these tools.
- ✅ Every construction is a proof — arcs show equal distances, not just pretty curves.
| Fact | Detail |
|---|---|
| Origin | Euclid’s Elements, c. 300 BCE |
| Tools allowed | Compass (for arcs) + straightedge (unmarked ruler) |
| Tools NOT allowed | Protractor, marked ruler, calculator |
| Core skill tested | Grades 6–10 geometry; SAT, ACT, state exams |
| Most tested construction | Perpendicular bisector & angle bisector |
| Famous impossible problem | Trisecting a general angle (proven 1837) |
What Is Compass Geometry? 🧭
Compass geometry is the art and logic of constructing exact geometric figures using two tools: a compass (a hinged instrument that draws arcs and circles) and a straightedge (a ruler with no measurement markings). The compass does not measure — it transfers distance. That distinction is everything.
When you open a compass to a certain width and draw an arc, every point on that arc is exactly the same distance from the pivot. That single property — equal radius — is the engine behind every construction in this guide.
The formal name is Euclidean construction, named after the Greek mathematician Euclid who codified these methods around 300 BCE in his 13-volume work Elements. For over 2,000 years, these constructions were the gold standard of geometric proof. Today, they still appear on standardised tests worldwide and form the backbone of middle and high school geometry.
A ruler has millimetre markings. Using those markings to measure is cheating in a classical construction — it introduces approximation. A straightedge only lets you draw a straight line between two known points. The precision comes from the compass arcs, not from measuring.
What Tools Do You Actually Need? 🛠️
You need exactly two tools: a compass and a straightedge. Here is what to look for in each.
| Tool | What it does | What to look for | Common mistake |
|---|---|---|---|
| Compass | Draws arcs and circles of a fixed radius | Metal tip, tight hinge, pencil attachment | Loose hinge lets the width slip mid-arc |
| Straightedge | Draws straight lines between two points | Flat edge, long enough for the construction | Using the ruler markings to measure (not allowed) |
| Sharp pencil | Marks points and draws thin arcs | HB or 2H, freshly sharpened | Thick pencil lines make intersections ambiguous |
How Do You Perform the 6 Core Compass Constructions? 📐
These six constructions cover the vast majority of what appears on school exams. Master these and you can build almost any geometric figure.
Construction 1: Perpendicular Bisector of a Line Segment
A perpendicular bisector cuts a line segment exactly in half at a 90° angle.
- Draw line segment AB.
- Open the compass to more than half the length of AB.
- Place the compass point on A. Draw arcs above and below the segment.
- Without changing the width, place the compass on B. Draw two more arcs crossing the first pair.
- Label the two crossing points C and D. Draw line CD with the straightedge.
- Line CD is the perpendicular bisector. It crosses AB at its exact midpoint at 90°.
Construction 2: Angle Bisector
An angle bisector divides an angle into two equal halves.
- Place the compass point on the vertex of the angle. Draw an arc that crosses both rays — label the crossings P and Q.
- Place the compass on P and draw an arc inside the angle.
- Without changing width, place the compass on Q and draw another arc crossing the first. Label the crossing R.
- Draw a ray from the vertex through R. This ray bisects the angle exactly.
Construction 3: Copy an Angle
Copying an angle transfers its exact measure to a new location without a protractor.
- Draw a new ray from point A’ (your new vertex).
- On the original angle, draw an arc from the vertex crossing both rays. Copy that same arc from A’.
- Measure the chord distance between the two crossing points on the original angle.
- Transfer that chord distance to the arc on the new ray. Mark the crossing point.
- Draw a ray from A’ through the new crossing point. The angle is copied exactly.
Construction 4: Construct a 60° Angle (and Equilateral Triangle)
A 60° angle is the easiest exact angle to construct — it comes directly from an equilateral triangle.
- Draw a line and mark point A.
- Open the compass to any radius r. Draw an arc from A crossing the line at B.
- Without changing the radius, place the compass on B and mark point C on the arc.
- Draw ray AC. Angle BAC = exactly 60°.
- To complete the equilateral triangle, draw arc from C with the same radius crossing the arc from A. Connect all three points.
Construction 5: Perpendicular from a Point to a Line
Drop a perpendicular from an external point to a line — essential for finding heights in triangles.
- Mark external point P above line l.
- From P, draw an arc that crosses line l at two points, X and Y.
- From X and Y, draw two arcs below the line that cross each other at Q.
- Draw line PQ. It is perpendicular to line l.
Construction 6: Parallel Line Through a Point
Draw a line through point P that is parallel to a given line — uses the copied-angle method.
- Draw a transversal through point P crossing the given line at Q.
- At Q, the transversal forms an angle with the given line.
- Copy that angle at point P on the same side of the transversal (Construction 3 above).
- The new ray through P is parallel to the given line (corresponding angles are equal).
In my experience, students who start with the angle bisector get confused because the vertex feels like a special “magic point.” The perpendicular bisector is more transparent — you can see exactly why the two arcs must cross on the midpoint (they are both radii of equal length from each endpoint). Once that logic clicks, every other construction makes sense. Start here, always.
Visual Solution: Perpendicular Bisector Step-by-Step 🎨
The diagram below shows the perpendicular bisector construction in ASCII art. Each character represents a point or arc. Study the arc crossings at C and D — those are the key intersections.
📐 Perpendicular Bisector of Segment AB
         C
         |
  arc    |    arc
 from A  |   from B
   \     |     /
    \    |    /
     \   |   /
      \  |  /
       \ | /
A-------M-------B       (M = midpoint, line CM⊥AB)
       / | \
      /  |  \
     /   |   \
    /    |    \
   /     |     \
  arc    |    arc
 from A  |   from B
         |
         D

Legend:
  A, B  = endpoints of the segment
  C, D  = where the arcs cross (above and below)
  M     = midpoint of AB (where CD crosses AB)
  CD    = perpendicular bisector (90° to AB at M)
  All arcs drawn with the SAME compass width > AB/2
Notice that AC = BC = AD = BD (all equal to the compass radius). That equality is the geometric proof that M is the midpoint and CD is perpendicular.
Worked Examples: Compass Geometry in Action 🔢
Theory is only half the story. Here are two fully worked examples you can replicate on paper right now.
Setup: You have angle ABC = 120°. Bisect it.
Step 1: Place the compass on vertex B. Draw an arc crossing ray BA at P and ray BC at Q.
Step 2: Place the compass on P. Draw an arc inside the angle.
Step 3: Same compass width, place on Q. Draw an arc crossing the previous one at R.
Step 4: Draw ray BR.
Result: Angle ABR = Angle RBC = 60° each.
Check: If you now bisect one of those 60° angles, you get 30°. Bisect again for 15°. Compass bisection is how you build any angle that is a multiple of 3° — without a protractor.
Why it works: A regular hexagon has sides equal to the circle’s radius. This is a non-obvious fact that makes the construction trivially simple once you know it.
Step 1: Draw a circle with centre O and radius r.
Step 2: Mark any point A on the circle.
Step 3: Open the compass to radius r (same as the circle). Place on A, mark B on the circle.
Step 4: Move to B, mark C. Continue: C→D, D→E, E→F, F back to A.
Step 5: Connect A–B–C–D–E–F–A with the straightedge.
Result: A perfect regular hexagon. Each side = r, each interior angle = 120°.
Why students miss this: They try to calculate 60° and measure it with a protractor. The compass method is faster, exact, and requires zero angle measurement.
When I first showed the hexagon-in-a-circle construction to a group of 8th graders, several of them refused to believe the sides were equal to the radius without measuring. So I had them measure — and every single one came out within the pencil-line width of exact. That moment of “wait, it actually works” is more powerful than any textbook explanation. The compass is a proof machine, not just a drawing tool.
What Are the Most Common Compass Geometry Mistakes? ⚠️
These five mistakes account for the majority of wrong constructions I see from students at every level.
| Mistake | What goes wrong | Fix |
|---|---|---|
| Changing compass width between steps | Arcs no longer intersect at the correct point | Lock the hinge; do not lift and re-open the compass mid-construction |
| Compass width less than half the segment | Arcs from A and B never cross — no intersection point | Always open to MORE than half the segment length |
| Pressing too hard on the pivot | The pivot hole widens; the compass slips | Light, steady pressure — let the pencil do the work |
| Drawing arcs too short | Arcs miss each other; no intersection visible | Extend arcs well past the expected crossing point |
| Using a protractor instead of compass | Construction is approximate, not exact; fails proof-based questions | Use the compass-only method; protractors are for measurement tasks only |
Compass vs. Protractor vs. Ruler: Which Tool Does What? 🔍
Students often confuse these three tools. Here is a clear breakdown of what each one does — and what it cannot do.
| Tool | Measures? | Constructs? | Exact? | Allowed in classical geometry? |
|---|---|---|---|---|
| Compass | No (transfers distance) | Yes — arcs, circles, bisectors | ✅ Exact | ✅ Yes |
| Straightedge | No | Yes — straight lines between points | ✅ Exact | ✅ Yes |
| Protractor | Yes — angles in degrees | Approximate only | ❌ Approximate | ❌ No (for constructions) |
| Marked ruler | Yes — lengths in mm/cm | Approximate only | ❌ Approximate | ❌ No (for constructions) |
The key insight: a compass construction is a proof. A protractor drawing is a measurement. These are fundamentally different in mathematics. A construction can be verified logically; a measurement can only be verified by re-measuring.
💡 Unique Insight: The Three Impossible Constructions — and Why They Matter
Most guides teach you what you can construct. Almost none explain what you cannot — and why that matters for understanding the limits of compass geometry.
Three constructions were attempted for over 2,000 years before being proven impossible in the 19th century: (1) trisecting a general angle, (2) doubling the cube (constructing a cube with exactly twice the volume of a given cube), and (3) squaring the circle (constructing a square with the same area as a given circle). Pierre Wantzel proved the first two impossible in 1837 using abstract algebra; Ferdinand von Lindemann proved the third in 1882 by showing π is transcendental.
Why does this matter for students? It shows that compass geometry is not just a drawing exercise — it is a system with provable boundaries. Understanding that some problems are genuinely unsolvable with given tools is one of the deepest lessons in all of mathematics. If a student spends 20 minutes trying to trisect an angle with a compass, they are not failing — they are attempting something that stumped humanity for two millennia.
🧠 Quick Quiz: Test Your Compass Geometry Knowledge
Select your answer, then click “Show Answer” to check.
Q1. When constructing a perpendicular bisector, the compass must be opened to:
Show Answer
✅ More than half the segment length. If you open to exactly half, the arcs from each endpoint just touch at the midpoint and do not cross — you get no intersection point to draw through. Opening to more than half guarantees two clear crossing points above and below the segment.
Q2. Which of the following is proven to be impossible with compass and straightedge alone?
Show Answer
✅ Trisecting a general angle. Pierre Wantzel proved in 1837 that dividing a general angle into three equal parts using only compass and straightedge is mathematically impossible. Constructing 60° and bisecting a segment are both straightforward compass constructions.
Q3. A regular hexagon inscribed in a circle has sides equal to:
Show Answer
✅ The circle’s radius. Each side of a regular hexagon inscribed in a circle equals the radius of that circle. This is why you can construct a perfect hexagon by stepping around the circle six times with the compass set to the radius — no measurement needed.
✏️ Practice Problems: Try These Yourself
Attempt each construction on paper, then reveal the solution steps.
Problem 1: Construct a 30° angle using only a compass and straightedge.
Step 1: Construct a 60° angle (Construction 4 above).
Step 2: Bisect that 60° angle (Construction 2
Sources & References
Written and fact-checked by Dr Irfan Mansuri. External links open in a new tab and are provided for further reading and verification.